Installing a new over-the-range microwave is a fantastic way to free up counter space and modernize your kitchen. However, a successful installation depends entirely on the prep work you do before opening the box. From accurate measurements to understanding electrical needs and what's behind your wall, getting the details right is the key to a smooth, stress-free project.
Your Pre-Installation Game Plan

Before you begin, you need a solid game plan. Rushing this initial stage is the single biggest mistake homeowners make, often leading to frustration when the microwave doesn't fit or the wall can't support its weight. Taking just 30 minutes to an hour for these checks can save you hours of headaches later.
This checklist is your mission briefing. It covers the crucial measurements, structural checks, and electrical details specific to homes in Edmonton. Following these steps will help you start your project on the right foot, avoiding unexpected costs and delays.
Measure Twice, Install Once
Precision is crucial when fitting a heavy appliance perfectly between two cabinets. Your first task is to grab a tape measure and verify the horizontal space.
- Cabinet Width: Measure the exact distance between the cabinets flanking your stove. Most over-the-range microwaves are designed for a standard 30-inch opening, but you must confirm your specific space. If it’s too narrow, the installation won't work. If it's too wide, you may need cosmetic filler strips to close the gaps.
- Cabinet Depth: Measure from the front edge of your upper cabinet back to the wall. Standard cabinets are typically about 12 inches deep. This measurement ensures the microwave door can swing open completely without hitting anything.
- Vertical Clearance: Finally, measure from the bottom of the upper cabinet down to the cooktop. Most manufacturers recommend at least 13 to 17 inches of clearance to prevent heat damage to the microwave's underside.
Pro Tip: Don't measure just once. Take measurements at both the front and back of the cabinet opening, as walls aren't always perfectly square, especially in older Edmonton homes. Always use the smallest measurement as your guide to ensure a proper fit.
Verify Your Electrical Setup
An over-the-range microwave is a high-power appliance and requires its own dedicated circuit to operate safely. Simply plugging it into the nearest outlet is a major fire hazard and should be avoided.
You must have a dedicated 120-volt, 15- or 20-amp circuit for the microwave. "Dedicated" means no other lights or appliances in your kitchen share that circuit breaker. If you are replacing an old range hood, it likely shared a circuit. A quick check of your breaker panel can often clarify this. If you are not 100% certain, it is always safest to call a licensed electrician.
If you're wondering whether your old appliance is worth replacing, our guide on deciding between appliance repair or replacement offers valuable insights.
Locate Wall Studs for Support
Your new microwave is heavy, typically weighing between 50 and 70 pounds. Drywall alone cannot support this weight over time. The mounting bracket must be securely screwed into the wooden studs inside the wall.
Use an electronic stud finder to locate at least two studs within the 30-inch opening, marking their positions with a pencil. Ideally, you'll find two studs perfectly positioned for the bracket. If the studs are not ideally placed, you might need to use toggle bolts in the drywall for additional support, but ensure at least one side of the bracket is firmly anchored to a stud.
Assess Your Ventilation Needs
Proper kitchen ventilation is essential in Edmonton, especially during long winters when windows remain closed. You need an effective way to manage cooking odours, smoke, and moisture. Over-the-range microwaves offer two ventilation options:
- Recirculating (Ductless): This system pulls air through a charcoal filter to trap grease and smells, then releases the cleaned air back into your kitchen. It is the ideal choice if you do not have existing ductwork.
- External Venting (Ducted): This is the more effective method, piping smoke, steam, and odours directly outside through ductwork in the wall or ceiling.
Examine the area above your stove. If you see a duct leading outside, you are set for external venting. If not, you will need a microwave that can be configured for recirculation. Many models support both, but you must verify this before making a purchase.
Demand for professional over-the-range microwave installation Edmonton has grown significantly, reflecting a city-wide trend toward space-saving kitchen upgrades.
Gather Your Tools and Materials
There is nothing more frustrating than pausing a project to find a missing tool. Before you start, take a few minutes to gather everything you will need. Having your tools laid out and ready will make the entire process much smoother.
| Tool/Material | Purpose | Pro Tip |
|---|---|---|
| Drill & Drill Bits | For drilling pilot holes and driving screws. | A cordless drill provides more freedom of movement in tight spaces. |
| Stud Finder | To locate wooden studs inside your wall. | An electronic model offers far greater accuracy than knocking on the wall. |
| Tape Measure | For all crucial width, depth, and height checks. | A locking tape measure is invaluable for this job. |
| Level | To ensure the mounting bracket is perfectly straight. | A crooked microwave will be a constant annoyance. Always use a level. |
| Pencil or Marker | For marking stud locations and drill points. | Keep a sharp pencil handy for precise marking. |
| Screwdrivers | Both Phillips and flat-head types will be necessary. | A multi-bit screwdriver saves trips to your toolbox. |
| Safety Goggles & Gloves | To protect your eyes and hands during installation. | Do not skip this. Drilling into walls can create flying debris. |
| Toggle Bolts (Optional) | For securing the bracket if studs aren't available. | Use these only to supplement stud mounting, never as the primary support. |
Once your toolkit is assembled, you are ready to proceed with removing the old unit and preparing the space.
Decoding Edmonton's Safety and Building Codes
Navigating local regulations can seem complex, but it is a critical part of ensuring a safe and successful over-the-range microwave installation in Edmonton. Getting this wrong can result in failed inspections or, more seriously, create a safety hazard in your home.
The good news is that the rules are straightforward once you understand the technical details. Let's clarify the essential electrical codes and a common point of confusion regarding the Alberta Building Code to ensure your project is done correctly from the start.
The Great Clearance Debate Explained
A persistent myth about a strict clearance rule often confuses DIY installers. The Alberta Building Code specifies a minimum distance between a cooktop and any combustible materials above it, such as wooden cabinets. However, this rule does not apply to plug-in over-the-range microwaves.
A special bulletin from the Safety Codes Council clarifies that OTR microwaves are considered standard plug-in appliances, not built-in components regulated by that specific part of the code. This distinction greatly simplifies the installation process for homeowners.
Key Takeaway: For your OTR microwave installation, the manufacturer's installation manual is your ultimate authority—not the general building code for combustible clearances. Always follow the specific height and clearance requirements listed in your appliance’s instructions.
Your Manufacturer's Manual Is the Law
What do manufacturer instructions typically require? While specifics can vary between brands, a few standards are nearly universal.
The most critical measurement is often the height from the floor to the bottom of the upper cabinet, which is typically 66 inches. This height serves two vital safety functions:
- Fire Safety: It ensures adequate space between the hot cooking surface and the bottom of the microwave to prevent heat damage or a potential fire.
- User Safety: It places the microwave at an ergonomic height, reducing the risk of spilling hot liquids when reaching up to remove items.
Adhering to these instructions not only ensures safety but also protects your appliance's warranty. Deviating from the manual may give the manufacturer grounds to deny a claim if an issue arises.
Essential Electrical Safety Requirements
While the manual guides cabinet clearance, electrical work is governed by provincial and municipal codes. These are non-negotiable safety rules designed to prevent electrical shocks and fires, and they are strictly enforced in Edmonton.
Your over-the-range microwave requires its own dedicated electrical circuit. This means no other outlets, lights, or appliances can be connected to the same breaker. It is a high-power appliance, and sharing a circuit can cause overloading, leading to tripped breakers or an electrical fire.
The outlet for your microwave should also have GFCI (Ground Fault Circuit Interrupter) protection. A GFCI outlet is designed to quickly shut off power if it detects a current imbalance, a common occurrence if an appliance comes into contact with water. This feature is a crucial safety measure that significantly reduces the risk of electric shock.
If you are dealing with complex wiring or are unsure about your current setup, it is always best to consult a professional. You can get more information from experts who handle frequent Edmonton appliance repair calls related to improper installations.
Safety regulations are fundamental to appliance installations in Alberta. While the Alberta Building Code 2006 requires 750 mm clearance for combustible materials above ranges, a crucial 2009 Safety Codes Council bulletin clarifies this does not apply to OTR microwaves. By defining them as plug-in appliances, this interpretation has helped prevent non-compliant installations across Edmonton. You can review the details in the official bulletin on building code interpretations.
Mounting and Securing Your New Microwave
This is where your preparation pays off. With the old range hood removed and the wall ready, it's time to install your new over-the-range microwave. This guide provides practical steps based on real-world experience in Edmonton kitchens.
First and foremost, this is non-negotiable: turn off the power. Go to your electrical panel and flip the breaker for the relevant circuit. Do not rely solely on a wall switch. This is a critical safety rule.
Nailing the Placement
Your new microwave includes two large paper templates. These are essential for the next 20 minutes. One is for the back wall to mark the mounting bracket position, and the other is for the cabinet above to mark holes for the top bolts.
Take your time. Tape the wall template in place and use your level to ensure it is perfectly straight, as a crooked template will result in a crooked microwave. Once aligned, mark the drill points, paying close attention to the stud locations you identified earlier.
Next, tape the second template to the underside of the upper cabinet, aligning it with the wall template below. Mark the holes for the support bolts and the larger opening for the power cord.
Expert Tip: Before drilling, perform a "dry fit." Hold the metal mounting bracket against the marks on your wall. A quick visual check now can prevent patching extra holes later.
Installing the Mounting Bracket
This bracket is the foundation of your entire over-the-range microwave installation Edmonton. It supports most of the weight and must be anchored into wall studs.
Drill pilot holes into the center of your stud marks using a bit slightly smaller than the provided lag bolts. This prevents the wood from splitting and simplifies driving the bolts.
Secure the bracket to the wall with the lag bolts. Use your level one last time before tightening them completely. The bracket should sit flat against the wall and feel solid. If it moves at all, stop and reassess. At least one side of the bracket must be screwed firmly into a stud.
The Two-Person Lift
Do not attempt this alone. An over-the-range microwave is heavy and awkward to handle by yourself, creating a risk of injury or damage to the appliance. This is always a two-person job.
With a partner, carefully lift the microwave. As you approach the wall, one person should guide the power cord up through the hole in the cabinet while the other supports the weight.
Once the cord is clear, tilt the microwave forward and hook its bottom edge onto the tabs of the mounting bracket. You will feel it catch. The bracket will now support the back of the unit, allowing you to pivot the front up flush against the cabinet.
Securing the Top and Venting
While one person holds the microwave steady, the other should be inside the cabinet to drop the top support bolts through the drilled holes. Hand-tighten them first to avoid cross-threading.
A common mistake is over-tightening these bolts. Cranking them down too hard can warp the microwave's top or crack the cabinet bottom. They just need to be snug enough to prevent any wobbling.
If you are venting to the outside, now is the time to connect the ductwork.
- Check the Damper Flap: Before connecting, find the small flap on the microwave's exhaust. Ensure it can open and close freely. A stuck damper will prevent proper venting.
- Seal the Connection: Align the microwave's vent port with your home's ducting. Use high-quality foil tape—not duct tape—to create an airtight seal. This prevents grease and odours from leaking into your cabinets.
This flow chart clarifies how Edmonton's building codes apply to OTR microwaves.
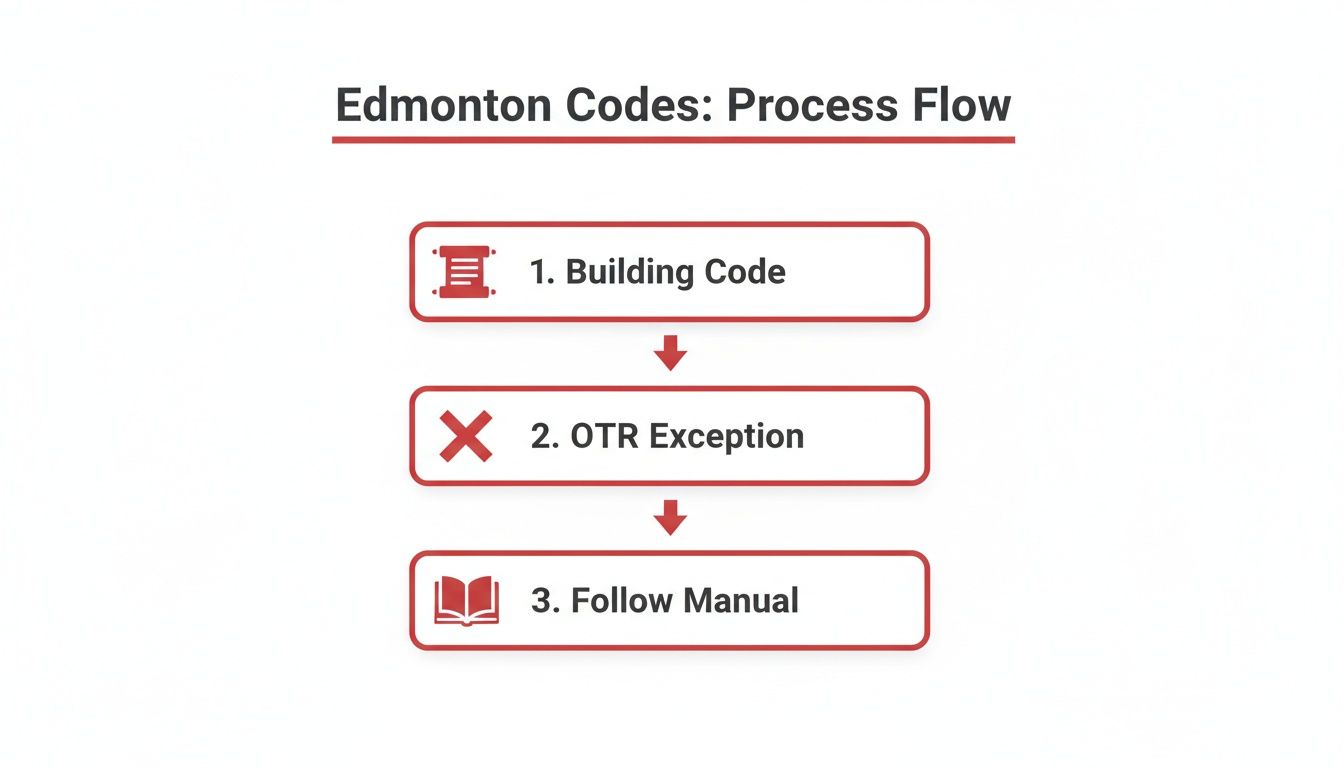
As shown, for a standard plug-in OTR microwave, the manufacturer's installation manual is your guide for a compliant and safe setup, overriding general building code clearance rules.
The Final Checks
With the microwave secured and venting connected, plug the power cord into the outlet inside the cabinet.
Before finishing, run a full systems check. Turn on the light, spin the turntable, and test the fan on every speed. If vented outside, check that air is flowing out. Listen for any unusual rattles or vibrations that might indicate a loose part.
If your old range hood was failing before this project, you can learn more in our guide to professional range hood repair services.
You have now successfully installed your new over-the-range microwave, adding functionality and freeing up valuable counter space.
Budgeting Your Project in the Edmonton Area
Understanding the costs for your over-the-range microwave installation in Edmonton is key to a successful project. The final price can vary significantly depending on your kitchen's specific needs.
A straightforward replacement—removing an old OTR and installing a new one—is relatively simple. However, replacing an old range hood can be more involved. The primary cost factors are labour and any necessary modifications, such as new wiring or ductwork.
Professional Installation Costs
For a standard replacement, hiring a certified technician in Edmonton typically costs between $150 and $350. This usually includes removing the old unit, securely mounting the new one, and ensuring it functions correctly.
If your project is more complex, you should budget for additional costs.
- New Electrical Circuit: Your microwave requires a dedicated outlet. If one doesn't exist in the cabinet above, an electrician will need to install one, which can add $200 to $500. This is a critical, non-negotiable safety step.
- New Ductwork: If you are adding external venting for the first time, a technician must run ductwork outside. This can add $200 to $600 or more, depending on the distance and your home's layout.
Basic labour might cost $100-$300, but this can easily double if new ducting is required, which is common in older Edmonton neighbourhoods like Highlands where kitchens were not originally designed for modern venting. For a broader perspective, you can review these average microwave installation costs.
Cost Comparison: DIY vs. Professional Installation in Edmonton
Considering a DIY approach to save money? It's an option, but it's important to weigh the savings against potential risks and hidden costs.
Here’s a realistic cost comparison for Edmonton.
| Cost Factor | DIY Estimated Cost | Professional Service Estimated Cost |
|---|---|---|
| Labour | $0 (Your time) | $150 – $350 (Standard Install) |
| Tools & Materials | $50 – $100+ (If you don't own them) | Included in service fee |
| Potential Mistakes | Variable (Damaged cabinets, appliance, or wall) | Covered by technician's insurance |
| Electrical Work | Not recommended (Requires licensed electrician) | $200 – $500 (If needed) |
| Peace of Mind | Low to medium | High (Guaranteed proper installation) |
The Bottom Line: If you're simply swapping one OTR for a similar model and are comfortable with the tools and heavy lifting, a DIY approach can save you a couple of hundred dollars. However, for any job requiring new wiring or venting, hiring a licensed professional is the smartest and safest choice.
Timelines and Long-Term Value
A professional can typically complete a simple replacement in just 1-2 hours. If the installation involves new electrical or ductwork, it's best to set aside at least half a day.
Beyond the initial cost, a properly installed OTR microwave is a valuable investment. It frees up counter space, improves ventilation, and gives your kitchen a clean, modern look. With appliance prices rising, making a smart, durable choice is more important than ever. You can learn more about why appliances are getting more expensive and how to select a model built to last.
Troubleshooting Common Installation Hiccups
Even with careful planning, installations can encounter problems. You might measure twice, follow the template perfectly, and still face an unexpected issue. Most of these problems are common and fixable.
This guide will help you navigate those frustrating moments, from misaligned mounting holes to a microwave that won't power on. These are practical steps to resolve the typical challenges an over-the-range microwave installation Edmonton homeowner might encounter.
Solving Physical Mounting Problems
Most issues arise during the mounting process. A wall that isn't perfectly plumb or studs that are slightly off-center can complicate your plans.
Problem: The Mounting Holes Don't Align with Studs
You've found the studs, but the bracket holes don't line up. This is a common issue, especially in older Edmonton homes with unpredictable framing.
- Solution: The top priority is to secure at least one side of the bracket firmly into a stud with a lag bolt. For the other side, if a stud is out of reach, use heavy-duty toggle bolts rated well above the microwave's weight (aim for 75+ lbs). These anchors expand behind the drywall to create a strong hold.
Problem: The Microwave Isn't Flush with the Wall or Cabinets
After hanging the unit, you notice an ugly gap or it sits crooked. This is often caused by an uneven backsplash or a bowed wall.
- Solution: Use shims. Small wooden or plastic shims can be placed between the wall and the mounting bracket to level it. Loosen the bracket, insert shims where needed until the unit is level and flush, and then re-tighten everything.
Tackling Post-Installation Electrical and Functional Issues
The microwave is installed but isn't working correctly. These problems often point to a simple electrical oversight or setup error.
Problem: The Microwave Won't Turn On
This is a common post-installation panic. Before assuming the unit is faulty, perform these quick checks.
- Check the Breaker: Go to your electrical panel and confirm the breaker for that circuit is in the "On" position. It may have tripped during installation.
- Test the Outlet: Unplug the microwave and plug in a device you know works, like a phone charger. If it doesn't power on, the issue is with the outlet, not the microwave.
- Inspect the GFCI: Look for a GFCI outlet on the same circuit—it has "Test" and "Reset" buttons. It might be located further down the counter. Press the "Reset" button firmly.
If these steps don't resolve the issue, it's best not to guess. Persistent electrical problems require professional residential troubleshooting electrician services. A licensed electrician can safely diagnose and fix underlying wiring issues.
Problem: The Fan is Loud or Making a Grinding Noise
A noisy fan usually indicates an obstruction or misalignment.
- Check the Damper: The small metal flap on the exhaust port can easily get bent or stuck during installation. Ensure it can move freely.
- Verify Fan Orientation: Most microwaves allow you to orient the fan blower for either recirculation or external venting. If it's set for the wrong configuration, it will be loud and ineffective. Double-check your manual to confirm it's in the correct position for your setup.
Knowing When to Call an Edmonton Pro
There is great satisfaction in a successful DIY project, but a key part of that success is recognizing your limits. While installing an over-the-range microwave can be a rewarding weekend job, some situations clearly indicate it's time to call a licensed Edmonton professional. This isn't about giving up—it's about making a smart, safe choice for your home.
Major Electrical Red Flags
Electrical work is the clear dividing line between a manageable project and a job that requires a certified expert. If you encounter any of these issues, stop the DIY work immediately.
-
No Dedicated Outlet: You open the cabinet above your stove and find no outlet, or one that's shared with your kitchen lights. An OTR microwave needs its own dedicated circuit to prevent overloads and fire hazards. Running a new line from the breaker panel is not a DIY task.
-
Old or Unsafe Wiring: In many older Edmonton homes, you may find outdated wiring, such as aluminum, or wires that are frayed, brittle, or improperly grounded. Tampering with this type of wiring without professional training is extremely dangerous. A licensed electrician must be called to bring everything up to current code.
Complex Structural or Venting Changes
Sometimes the challenge is not the wiring but the physical space. Modifying cabinets or creating a new ventilation path requires a level of precision that is difficult to achieve without proper tools and experience.
Knowing how to choose a general contractor can help you find the right professional for these tasks.
It's likely time to call a pro if you face these hurdles:
-
Running New Ventilation Ducts: Cutting a new path for an external vent through a ceiling or an exterior wall is a major project. It involves more than just drilling a hole; you must cut through structural materials and ensure the duct is perfectly sealed to prevent air leaks and heat loss—a significant concern in Edmonton's climate.
-
Custom Cabinet Modifications: If your cabinets are not a standard size or need to be cut to fit the new microwave, a single wrong move can ruin them. A professional has the experience to make precise, clean cuts that look good and maintain the integrity of your cabinetry.
Expert Insight: The moment a job requires altering your home's core electrical or structural systems, the DIY risk increases significantly. A professional installation is backed by insurance and guarantees the work meets all local Edmonton building codes.
The Value of Professional Peace of Mind
Ultimately, hiring a professional for your over-the-range microwave installation in Edmonton is an investment in safety, quality, and your own sanity. A certified technician ensures the unit is mounted securely, wired correctly, and vented properly. This not only protects your new appliance's warranty but also eliminates the risk of future problems from a small installation mistake.
If you're still undecided, our article on the top reasons why hiring an appliance repair company is your best bet outlines more benefits of professional service. When in doubt, let an expert handle it.
Answering Your Top OTR Microwave Questions
When it comes to installing an over-the-range microwave, Edmonton homeowners often have a few key questions. Let's tackle the most common ones we hear, from permits to proper venting for our chilly climate.
Do I Need a Permit for This in Edmonton?
Probably not. For a simple replacement—removing an old OTR and installing a new one—you generally do not need a permit in Edmonton. The city considers this a standard appliance replacement.
However, if you need to modify the wiring, the rules change. You will need an electrical permit if the job involves:
- Running a new, dedicated circuit for the microwave.
- Adding a new electrical outlet where one did not previously exist.
- Moving any existing wiring to accommodate the new unit.
Any work requiring a permit must be performed by a licensed electrician to ensure safety and compliance with Edmonton's code.
Is External Venting Necessary in Edmonton's Climate?
While you can use a recirculating model, we highly recommend venting your microwave to the outside. During Edmonton's long winters, windows are typically shut for months, trapping cooking steam, smoke, and odours inside.
A recirculating fan only filters some grease and pushes the same moist, stale air back into your kitchen. An external vent removes it completely, improving indoor air quality and reducing humidity that fogs up windows. If you have the option, venting outside is always the better choice.
A Quick Tip: Worried about cold drafts from the vent? A professional installation includes a properly sealed duct and a backdraft damper. This flap closes automatically when the fan is off, stopping cold air from entering.
What Is the Minimum Clearance Above My Stove?
This is a common point of confusion. While you may hear about building codes for combustibles, a specific bulletin clarifies that this does not apply to plug-in OTR microwaves.
The only rule you need to follow is this: check the manufacturer’s installation manual. This is your definitive guide. Most brands require a minimum clearance of 13 to 17 inches from the cooktop to the bottom of the microwave. Adhering to this specification is non-negotiable for safety and to keep your warranty valid.
Can I Install an OTR Microwave Over a Gas Range?
Absolutely. You can install an over-the-range microwave over a gas range just as you would an electric one. The installation steps and clearance requirements are the same. Just be sure to follow the height specifications in your microwave's manual to provide adequate space for the gas burners and prevent heat damage.
Need appliance repair? Visit RepairMyAppliance.ca or call 587-416-5888 for fast, professional service.